PIONEER DDJ-SR

INSTALLATION
Firmware & Drivers
Firmware: Update the firmware of the unit to the latest version from
http://www.pioneerdj.com/en/support/software/ddj-sr/#firmware-update
Drivers (for Windows only): Install the latest ASIO drivers from http://www.pioneerdj.com/en/support/software/ddj-sr/#drivers
No drivers are required for Mac OSX computers
VirtualDJ Setup
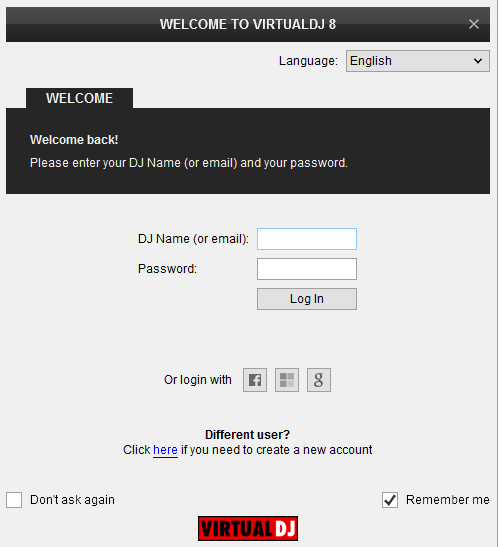
Once VirtualDJ 8 is launched, a Login Window will appear. Login with your virtualdj.com account.
A Pro Infinity or a Pro Subscribtion License is required to fully use the Pioneer DDJ-SR. Without any of the above Licenses, the controller will operate for 10 minutes each time you restart VirtualDJ.
http://www.virtualdj.com/buy/index.html
Click on the "Use Soundcard" button if speakers are connected to the Master Output of the DDJ-SR. You can still change that from Settings->AUDIO tab.
Click to OK.
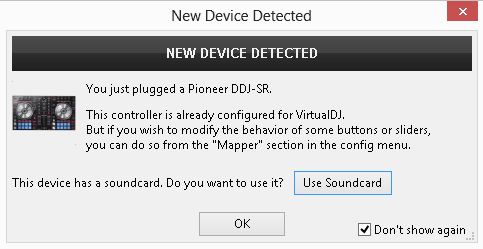
The unit is now ready to operate with VirtualDJ.
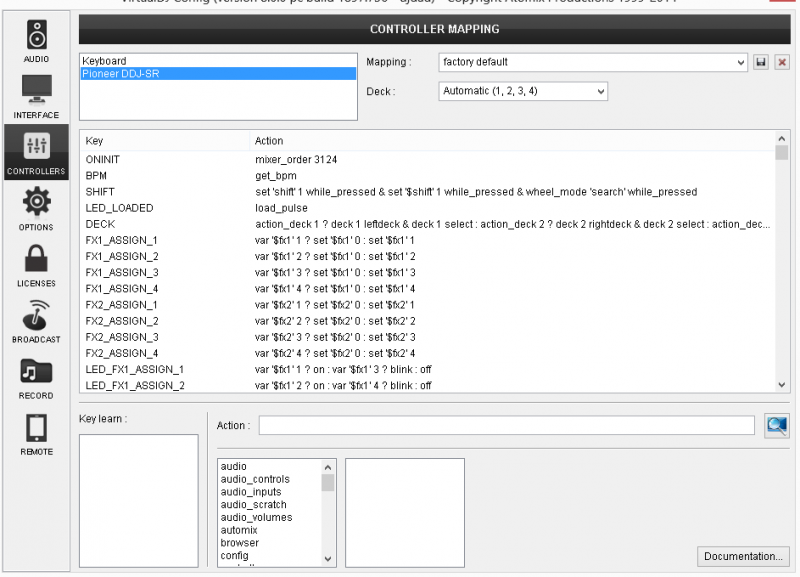
MIDI Operation
Find more details at
http://www.virtualdj.com/wiki/VDJ8script.html
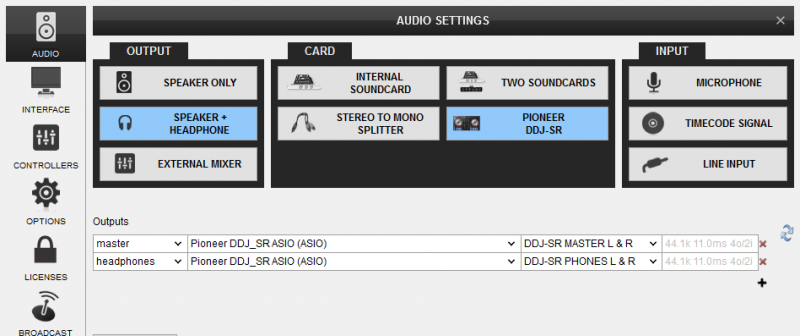
AUDIO Setup
The unit has a pre-defined Audio setup and a special button in the AUDIO tab of Config to provide that.
Please read the manual of DDJ-SR for further functionality.
http://www.pioneerdj.com/en/support/documents/ddj-sr/
For further software settings please refer to the User Guides of VirtualDJ 8.
http://www.virtualdj.com/manuals/virtualdj8/index.html
MIXER
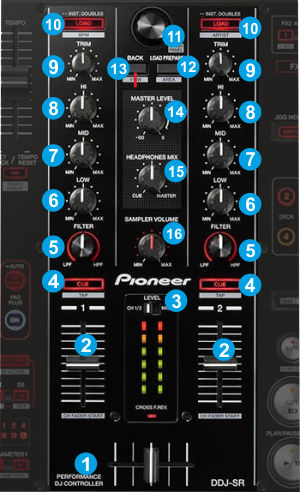
- CROSSFADER: Blends audio between the left and right channels.
- VOLUME: Alter the sound of the selected software Deck, depending on the (22) Deck Selectors. While SHIFT is held down, the VOLUME faders will stop the deck at the previously selected Cue point when these reach the minimum level (zero) and will start the deck (synced to the other deck) if those move from the zero position. (Fader Start)
- LEVEL METERS VIEW: Switch to MASTER position if you wish the Volume Indicator LEDs to show the level of the Master Output. Switch to CH1-2 position to view the outputted level of the left and right selected software decks.
Note that in the MASTER position, the VU LEDs operate in hardware mode and will show activity only if the Sound card of the DDJ-SR is used as Output in the Audio config. - PFL. Press this button to send this channel's pre-fader signal to the Cue Channel for monitoring. When engaged, the button will be lit. Cued deck depends on the (22) Deck Selectors. Press SHIFT and then one of the PFL buttons to manually tap the tempo of the loaded track.
- FILTER. Applies a High Pass/Low Pass Filter on the track (middle position is Off position).
- EQ-LOW: Adjust the low (bass) frequencies of the corresponding software deck.
- EQ-MID: Adjust the middle (mid) frequencies of the corresponding software deck
- EQ-HI: Adjust the high (treble) frequencies of the corresponding software deck
- TRIM: Adjusts the audio level (gain) of the corresponding software deck.
- LOAD: Press one of these buttons while a track is selected to load it to left Deck (1 or 3) or right Deck (2 or 4) respectively, depending on the Deck Selectors (22). Press and hold the same button for more than 1 second, to unload the same deck.
Press SHIFT and the left/right LOAD buttons to sort the tracks of the Songs list by
BPM/Artist to descending or ascending order. - BROWSE Knob/push :
Knob: Scrolls through files or folders.
Push: If focus is on the Folders list and selected folder contains tracks, enters the Songs List otherwise opens/closes sub-folders. If on a different Browser window, loads the track to a deck.
When SHIFT is pressed, toggles between Normal and Zoom Browser (with mini decks) views - LOAD PREPARE: Adds the selected track to the Automix list of SideView. When SHIFT is pressed (AREA), it cycles through the available view of Sideview (Automix, Sidelist, Sampler, Karaoke, Clone views)
- BACK: Sets focus to the Folders List. If focus is on the Folders List already, use this button to open/close sub-folders.
Hold SHIFT and then use this button to cycles through the available Browser windows (Folders, Songs, SideView). - MASTER VOLUME : Adjusts the Master Output Volume (Hardware operation)
- PHONES VOLUME : Adjusts the Headphones (CUE) Output Volume (Hardware operation)
- SAMPLER VOLUME: Adjusts the Master Volume of the Sampler.
DECKS

- PLAY: Play/Pauses the track. Hold SHIFT and then press this button to play the track in Stutter mode (while pressed)
- CUE: When the Deck is paused, you can set a temporary Cue Point by moving the Platter to place the Audio Pointer at the desired location and then pressing the Cue Button. During playback, you can press the Cue Button to return the track to this Cue Point. (If you did not set a Cue Point, then it will return to the beginning of the track.). If the Deck is paused, you can press and hold the Cue Button to play the track from the Temporary Cue Point. Releasing the Cue Button will return the track to the temporary Cue Point and pause it. To continue playback without returning to the Temporary Cue Point, press and hold the Cue Button, then press and hold the Play Button, and then release both buttons.
Hold SHIFT and then press this button to return to the beginning of the track - SYNC: Syncs the deck with the opposite one. Hold SHIFT and then press this button to set the deck as Master Deck. Using 4 decks skins, all other decks will sync to the Master Deck.
- SHIFT: The SHIFT button if held offers additional functionality to several buttons/knobs.
- JOG: Touch sensitive platter for scratching (vinyl mode) or bending (CD Mode). Hold SHIFT and use the JOG in Seek (Search) mode.
- DECK SELECTORS: Select the deck you wish to control with both Deck and Mixer buttons/knobs/faders (1/3 for the left side and 2/4 for the right side).
- VINYL: Sets the Jog of the deck to Bend (CD) or Scratch (Vinyl) Mode.
- PITCH FADER : Adjusts the Tempo of the track
- SLIP: Enables Slip Mode on each deck. Several software functions (such as Jogwheel movements, HotCues and Loops) will apply temporary on the track, and the track will return to the position it would have been when those functions are not triggered.
- KEYLOCK: Press this button to enable/disable the Master Tempo (Key Lock) of the deck. Press and hold the same button to reset the Tempo (PITCH) to zero position. Hold SHIFT and press this button to select one of the available Pitch ranges for the PITCH/Tempo Slider.
- PAD PLUS MODE: The PAD MODE is fully supported in VirtualDJ 8, if the unit is set to the appropriate mode. In this mode, several functions follow the BPM of the loaded track. See PAD PLUS mode
- AUTOLOOP: Sets an Auto Loop.
- 1/2X-2X: Halves/Doubles the size of the Loop. Hold SHIFT and press the 1/2X or 2X buttons to set a Loop In or Loop Out point (for manual looping)
- LOOP LEDs: The Leds indicate the selected size of the Loop. The 1/ is combined with other leds to offer sizes less than 1 beat. The + indicates that a loop larger than 32 beats is selected.
- PARAMETER-/+: These buttons offer different functions depending on the Mode of the PADs. See PADS.
- PADS: The 8 PADs offer different functions depending on the Mode of the PADs. See PADS..
EFFECTS
The Left FX section (FX1) controls the effects of the Left selected software deck (1 or 3) and the Right FX section (FX2) controls the effects of the Right selected software deck (2 or 4).
Each one of the FX unit offers 2 modes. The Single Effect mode offers one effect slot but more parameters controls per effect. The Multi Effects mode offers 3 effect slots (to trigger more than 1 effect at the same time – chained effects). The selection between those 2 modes is done by pressing the TAP button while SHIFT is held.
Single FX mode
Hold SHIFT down and then use the TAP button to select the Single FX mode in the default GUI. The Single FX mode is selected by default on first launch
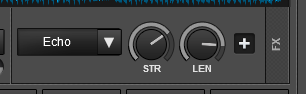
In this mode a single Effect is controlled with up to 6 Parameters and 3 Effect buttons. Only the first 2 Parameters are visible on the GUI. More Parameters and Effect buttons can be viewed in the FX GUI (opened from the + button on the GUI)
- FX1 ON. Press this button to enable/disable the selected effect to the Left/Right selected deck.
Hold SHIFT down and then use this button, to enable/disable the 1st effect button of the selected effect (if available). - FX2 ON. Press this button to select the previous effect from VirtualDJ Effects list. Hold SHIFT down and then use this button, to enable/disable the 2nd effect button of the selected effect (if available).
- FX3 ON. Press this button to select the next effect from VirtualDJ Effects list.
Hold SHIFT down and then use this button, to enable/disable the 3rd effect button of the selected effect (if available). - FX1 knob. Controls the 1st effect parameter of the selected effect.
Hold SHIFT down to control the 4th effect parameter of the selected effect (if available). - FX2 knob. Controls the 2nd effect parameter of the selected effect.
Hold SHIFT down to control the 5th effect parameter of the selected effect (if available). - FX3 knob. Controls the 3rd effect parameter of the selected effect.
Hold SHIFT down to control the 6th effect parameter of the selected effect (if available).
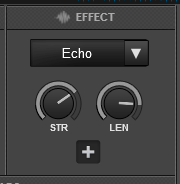
Multi FX mode
Hold SHIFT down and then use the TAP button to select the Multi FX mode in the default GUI.
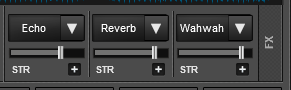

In this mode 3 different Effects can be applied and controlled with up to 2 Parameters for each FX slot. Only the first Parameter is visible on the GUI (and the 2nd Parameter while SHIFT is held on the DDJ-SR). More Parameters and Effect buttons can be viewed in the FX GUI (opened from the + button on the GUI)
- FX1 ON. Press this button to enable/disable the selected effect of FX slot 1.
- FX2 ON. Press this button to enable/disable the selected effect of FX slot 2.
- FX3 ON. Press this button to enable/disable the selected effect of FX slot 3.
- FX1 knob. Controls the 1st parameter of the selected effect of FX slot 1.
Hold SHIFT to control the 2nd parameter of the selected effect of slot 1. - FX2knob. Controls the 1st parameter of the selected effect of FX slot 2.
Hold SHIFT to control the 2nd parameter of the selected effect of slot 2 - FX3 knob. Controls the 1st parameter of the selected effect of FX slot 3.
Hold SHIFT to control the 2nd parameter of the selected effect of slot 3.
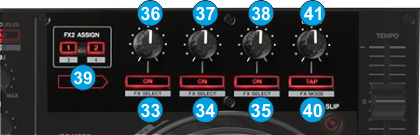
FX Clone & Beats
Starting from VirtualDJ 8.2, the selected Effects from one deck can be cloned (copied) to any other deck, using the FX ASSIGN buttons.
- FX ASSIGNS
FX ASSIGN 1 : Clone the selected Effects of Deck 1 to this deck
FX ASSIGN 2 : Clone the selected Effects of Deck 2 to this deck
SHIFT+FX ASSIGN 1 : Clone the selected Effects of Deck 3 to this deck
SHIFT+FX ASSIGN 2 : Clone the selected Effects of Deck 4 to this deck - BEATS. Use this knob to adjust the Beats of a Beat-aware Effect.
Currently only the Beats of the Echo effect can be adjusted using this knob. More Beat-aware Effects will be available in future versions. - TAP. Press this button to manually tap the tempo of the track. Press SHIFT and then this button to toggle between the Single and Multi Effect modes.
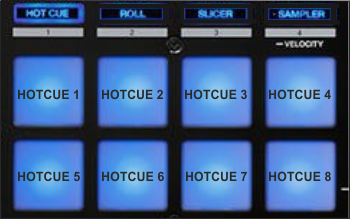
PADS
Pads (32) offer various functions, depending on the PAD MODE buttons. Each of the 4 PAD MODE buttons offers 2 individual modes (hold SHIFT and then press the PAD MODE button to access the additional mode). The modes represent a page of the PADS section on the default VirtualDJ GUI.
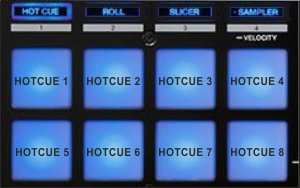
Hot Cue mode
Press the HOT CUE mode button to set the PADs to Hot Cue mode.
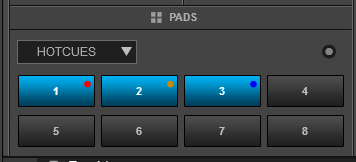
Each one of the 8 pad assigns a Hot Cue Point or jumps the track to that Hot Cue Point (if assigned).
When a Hot Cue Button is unlit, you can assign a Hot Cue Point by pressing it at the desired point in your track. Once it is assigned, the Hot Cue Button will light on.
Hold SHIFT and then press a pad to delete its assigned Hot Cue Point.
The PARAMETER buttons (31) jump the song to the previous/next assigned HotCue point.
Hold SHIFT and then use the PARAMETER buttons (31) to jump 1 beat backwards/forward.
Cue Loop mode
Hold SHIFT and then press the HOT CUE mode button to set the PADs to Cue Loop mode. The led of the HOT CUE button will blink to indicate this mode.
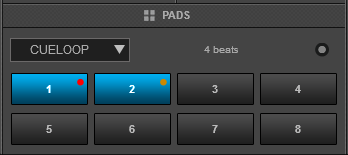
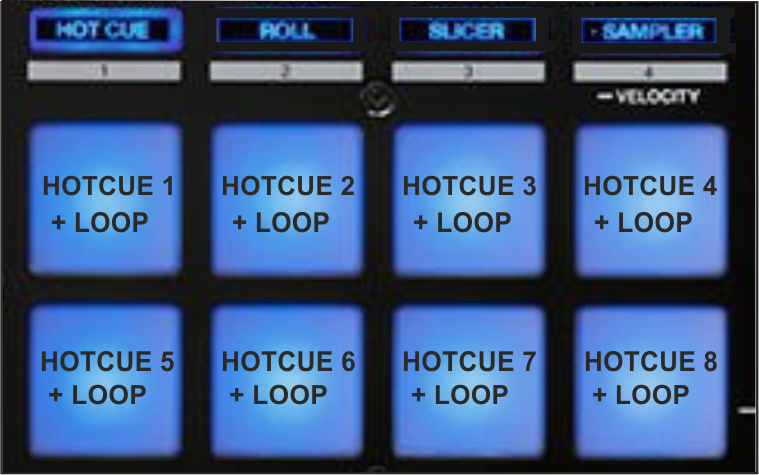
In this mode each one of the 8 pads assigns a Hot Cue Point or returns the track to that Hot Cue Point, but in both cases, it also triggers a Loop at that point (momentary or toggle depending on the selected mode from the Page menu).
Hold SHIFT and then press a pad to stutter/jump to the Hotcue (loop will remain triggered)
Use the PARAMETER buttons (31) to half/double the size of the triggered Loop.
Hold SHIFT and then use the PARAMETER buttons (31) to select the On/Off (Toggle) or Hold (momentary) Loop trigger mode.
By default the Cue Loops will be quantized. This can be turned off/on from the Page Menu on the GUI.
Loop Roll mode
Press the ROLL mode button to set the PADs to Loop Roll mode.
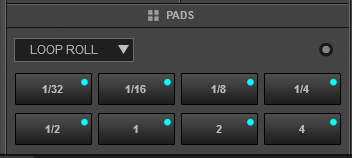
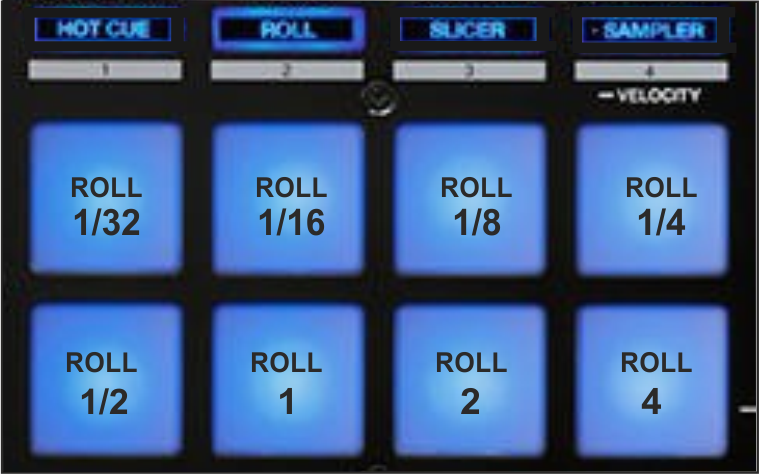
Press one of the 8 pads to trigger a momentary Loop Roll. Once the Pad is released, the track will resume playing from the position it would have been if the Loop Roll was never triggered. The exit point will be visible on the waveform of the VirtualDJ GUI with an additional “running” play marker.
Hold SHIFT to get a ½, ¾, 1 and 2 beats Loop Roll sizes for the 4 low pads.
Use the Page menu to apply the Loop Rolls to Video.
The PARAMETER buttons (31) are not used in this mode.
Loop mode
Hold SHIFT and then press the ROLL mode button to set the PADs to Loop mode. The led of the ROLL button will blink to indicate this mode.
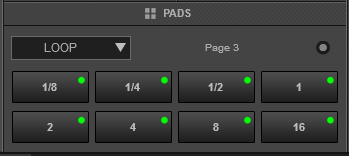
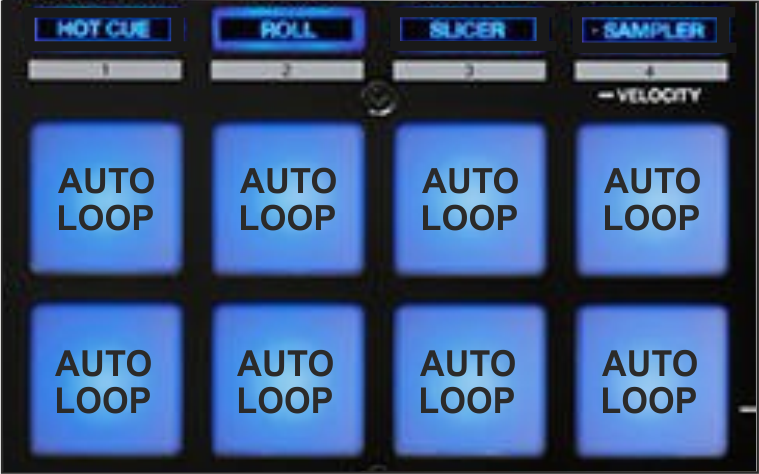
Press one of the pads to trigger an Auto Loop of a different size in beats, depending on the selected page. There are 6 different pages available with sizes starting from 1/32 up to 128 beats.
Use the PARAMETER buttons (31) to select the previous/next page with the desired Loop sizes
Hold SHIFT and then use the PARAMETER buttons (31) to change the behavior of the Loop pads, by selecting the On/Off (toggle), Hold (momentary – while pad is pressed) or the Roll mode (track will resume to the position it would have been once the pad is released)
Slicer mode
Press the SLICER mode button to set the PADs to SLICER mode.
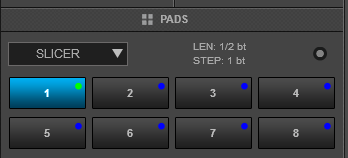
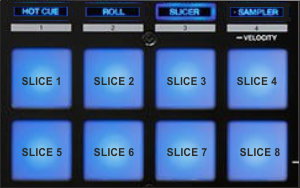
The 8 pads represent eight sequential beats—"Slices"—in the Beat Grid. The currently playing Slice is represented by the currently lit pad. The light will move through the pads as it progresses through each eight-Slice phrase. Press a pad to repeat that Slice (hold it down if you want to keep looping it).
Once the Pad is released the track will continue to play from the position it would have been if the pad was never pressed.
Hold SHIFT and then use the Pads to repeat the memorized Slices (the Slices played/repeated last time)
Use the PARAMETER (31) buttons to adjust the length of the Loop applied to the slice. Press SHIFT and then use the PARAMETER (31) buttons to adjust the step of the Slices
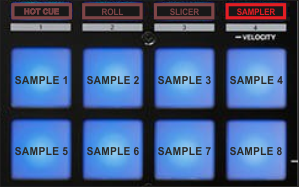
Sampler & Sampler Velocity mode
Press the SAMPLER button to set the PADs to Sampler mode.
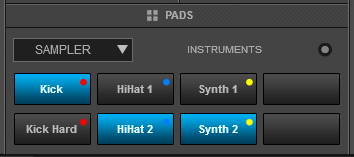
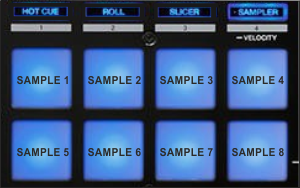
Each one of the pads triggers a sample from the selected Sampler Bank of VirtualDJ. If a bank has less than 9 samples, both sides of the DDJ-SR will control the same samples. If a bank has more than 8 samples, the left side of the DDJ-SR will control samples 1 to 8 and the right side samples 9 to 16. The PAD will be lit if a sample slot is loaded and will blink if triggered.
Press the pads to trigger a sample. Depending on the selected trigger Pad mode, use SHIFT and the same pads to stop the sample.
Use the PARAMETER (31) buttons to select the Sampler Bank (previous/next). Press SHIFT and then the PARAMETER (31) buttons to select the Trigger Pad mode (on/off, hold, stutter, unmute)
Press and hold the SAMPLER Pad mode button to set the PADs to Sampler Velocity mode. In this mode the Pads will additionally alter the Volume of the triggered Sample depending on the pressure (velocity).
Remix Points mode
Hold SHIFT and then press the SAMPLER mode button to set the PADs to Remix Points mode. The led of the SAMPLER button will blink to indicate this mode.

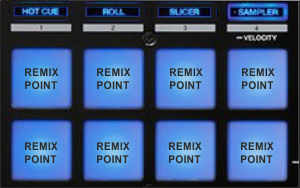
This mode offers the first 8 Remix Points of the loaded track. Remix Points are automatically defined from VirtualDJ, once the track is analyzed. Remix points can be managed from the POI Editor (more can be added/adjusted/deleted). They usually represent End/Start points of track’s blocks depending on the structure of the track and are always quantized when triggered.
The Remix points will be visible on the Song-position progress of the GUI (with white markers) once the Remix Points Pad page is selected.
PAD PLUS
Press the PAD PLUS ON button to enter the PAD PLUS mode. In this mode several functions of the Pads depend on the tempo of the track. The tempo of the track can be set manually as well, by tapping the TAP button (at least 4 times). Press and hold the TAP button (led will turn off) to return to the original tempo (defined by VirtualDJ).
HotCue Roll mode
 Press the HOT CUE mode button to set the PADs to HotCue Roll mode.
 In this mode the 8 Pads have the same functionality as the HOTCUE mode. In addition, the HotCues are triggered repeatedly (depending on the track’s tempo), as long as the pad is pressed. The speed of the trigger (measured in beats) is controlled by the PARAMETER (31) buttons.
Hold SHIFT and then press a pad to delete its assigned Hot Cue Point.
Trans mode
In this mode the 8 Pads mute the Volume of the track repeatedly (depending on the track’s tempo) as long as the pad is pressed, creating a cut effect. Each one of the pads offers a different speed (beats) and the size is displayed on the PARAMETER digits (see image). The last pad offers a mute in the Volume of the track (without repeat).
.
Combo FX mode
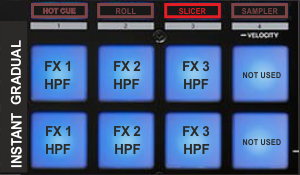 Press the SLICER mode button to set the PADs to Combo FX mode.
 In this mode the first 3 Pads trigger the corresponding FX slot and additionally they gradually apply a High Pass Filter (HPF) to the track, creating a Combo (Chained) Effect. The HPF can be applied instantly if the lower 3 Pads are used.
Pads 4 and 8 along with the PARAMETER (31) buttons are not used (will not affect the functionality of this mode)
Sampler Roll mode
Press the SAMPLER mode button to set the PADs to Sampler Roll mode.
In this mode the 8 Pads repeatedly trigger the corresponding Sampler slots (depending on the track’s tempo) as long as the pad is pressed, creating a Roll Sample effect.
The speed of the roll (measured in beats) is controlled by the PARAMETER (31) buttons
.
Press the pads to trigger a sample. Depending on the selected trigger Pad mode, use SHIFT and the same pads to stop the sample.
Recording & Microphone
No special configuration is required to record your mix with the DDJ-SR.
Simply open the MASTER center panel of the VirtualDJ GUI and click to the REC button (or BCAST for broadcasting) to record your mix.
The Microphone Input of the DDJ-SR is a hardware input. It cannot be control by VirtualDJ nor can the Microphone Volume knob be assigned to any action. The signal from this input is routed directly to the Master Output. Therefore, the Microphone input will not be recorded by default.
However. the Pioneer DDJ-SR has a dedicated Input to record your Main Mix along with the Microphone Input, a slight distortion may be present though, and thus this input is not used by default. If you wish to record both your mix and the Microphone/AUX Input, you will need to manually add a “record” line in the Audio configuration as followed..
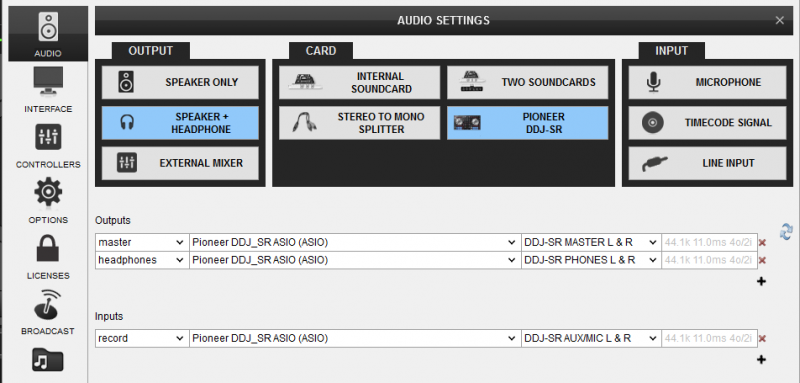
Note: if the record line is not present in the Audio configuration (default configuration), your Mix will be still recorded but not the Microphone Input.
